Wednesday, December 23, 2009

Merry Christmas!

Christmas dinner is at my house this year.  It's a first in many, many, many years.  I'm feeling rusty, but I know it will work out just fine.  There'll be 9 of us.  I have my list and won't stress (too much) about it. Today I'm making the Cranberry Sherbet, doing more cleaning and washing the wine glasses.

I won't be dreaming about a white Christmas... because we'll have one. 

A winter storm is heading our way.  Between tonight and Saturday, they say we'll get a foot or more of snow... which will add to the 4 inches already on the ground. 

The shovels are ready.  It's a good workout.

We don't always have snow on the ground at Christmas. Around here they call that a brown Christmas. I love snow at Christmas.

It's going to feel like living in a snow globe.
 
I saw the poem below on Paula's blog and she said I could share it with you.  (I'm still amazed at the countries that are represented on the blogs; Paula's from Luxembourg.  Pretty cool.) 


Santa's on his way

Twas the night before Christmas, I'm glued to the tree.

I'm wondering what Santa brought just for me.

Could it be fat quarters or a pattern or lace?

Or a quilt kit, I said, with a smile on my face.

And that's when I heard him, "Hi Santa," I said.

"You know....good little girls should be in their beds ."

"I know I should Santa, and now I've got caught.

But I was just so excited to see what you brought."

"Well, let's take a look in this room where you work."

He shook his head quickly and left with a jerk.

I heard him exclaim as he put it in gear.

"You've got enough stuff, I'll see you next year!"

author unknown


Santa's clearly not a quilter.  LOL.

Sunday, December 20, 2009

Loosen up and enjoy the stitching

To hoop or not to hoop? 

Jenny doesn't use a hoop.  Do you know Jenny?  She's a talented designer from Australia and has this blog, Jenny of Elefantz.  She gives some good reasons why not... and her proof is in the beauty of her embroidery.

With generous permission of Jenny, here's what she said about hoops:

"No, I never use a hoop. When I was rushing through my embroideries I had to use a hoop because when you rush you pull, then you pucker the fabric...but I have not used a hoop for the last year. Since I took care with the stitching and slowed down to enjoy the process and rhythm of the needle and thread working together with the fabric I have had no need of a hoop. The stitches are gently woven into the fabric and I can see that I have no need to pull or tighten. As I relaxed, the stitches relaxed with me."

I encourage you to read more in her original post on the subject (and check out her lovely work!).  Here are more tips from Jenny, and she has this about doing the satin stitch.  Good stuff.

I haven't yet given up the hoop.  It feels like an extra hand to help hold my work, but I've "loosened up" and slowed down, trying not to rush the stitches. 


But I'm still experimenting.  I plan to pull out my practice piece to try working without a hoop. 

My practice piece?  It's not pretty, but it's oh-so-useful.  See?


Where I've tried stem stitch and backstitch...


and practiced applique techniques...


and applique stem techniques...


and which has some of my first applique attempts...


Here are a few more tips, especially if you're new to embroidery:
  • Use a length of thread slightly longer than the length from the tip of your fingers to your elbow. 
  • During stitching, your thread will twist.  Every so often, let go of the needle and let it dangle towards the ground and let the thread untwist. 
  • Sometimes my thread gets naughty knotty.  It seems to happen when I've forgotten to untwist, or tried to use too long a thread, or am pulling the thread too quickly.  I carefully use the eye end of my needle to undo the knot so I don't fray the thread.  If it happens again with the same thread, I usually find that the troublemaker can't be rehabilitated, so I'm better off ending the offender and starting a new thread.  
  • Your needle will wear out and will need to be changed. I can tell when it's time because it seems like the needle doesn't slide through as easily.  When I look at the old needle versus a new one, I can see the difference... the finish looks worn down and dull.
  • You should remove your work from the hoop when you finish a stitching session, however "do as I say, not as I do." (Grin.)
I can't say it any better than Jenny did, "Enjoy the process, love what you do, and be at peace as you sew."

Saturday, December 19, 2009

Commenting on Blogs

The calendar might say it's still fall, but winter - and snow - is here to stay for the next few months.  It's the serene season.  The front planter is filled with greens, red twig dogwood and dried hydrangeas. 


Do you comment on blogs?  For a long time I didn't.  Why?  Because I didn't understand how it works and it seemed complicated.  It also seemed like you needed to have a blog to comment.  (You don't.)  Skip down a couple paragraphs below if you're interested.

I still don't comment on every post or blog I enjoy.  It takes time and I've found myself overwhelmed with the things I've added to my regular to-do list in the last couple months: writing my blog, stitching more, and commenting, in addition to work and normal life stuff.  I'm slowly adding to the list and trying to find a balance.  I am very grateful for the comments I receive because I know you've taken the time for me.

When you leave a comment, do you get a reply from the blogger back to your email?  You should... maybe not to every comment, but if you've NEVER received an email reply, you may be a "Noreply".  (Theresa W, I thought about this because you came up as a Noreply.)  It adds another dimension to this friendly blog-land... kind of like pen pals.  Did you have a pen pal when you were growing up?  I had a girl from England and looked forward to writing to her and receiving letters from her.  But I'm geting off track.... 

Fix your Noreply

If you use Blogger, it's simple to fix the no reply.  Sign in to Blogger, click Edit Profile (from your Dashboard), put a check on 'Show my email address', enter your email address in the 'Email address' spot, then click Save Profile.  That's it!

Want to comment without having a blog?

Okay, now to those of you who don't have a blog and never comment, but want to.  Here's what I'd suggest (although like everything, this isn't the only way). 

Before you go to the first step, now's the time to set up a separate email account if you want the blog correspondence to be separate from your other email.  (For example, I set up a free Gmail account.)
  1. Go to the Blogger start page.
  2. Click Create a Blog.  Trust me... you won't create a blog.
  3. Fill in the fields on the Create a Google Account form, then click Continue. 
    (If you already have a Google Acount, click 'sign in first' at the top of the page and log in.)
  4. Here's where you take the fork off the blog road.  On the 'Name your Blog' page, click at the bottom where it says 'Skip this and create a blog later'. 
  5. Are you at the Dashboard page?  Good.  Click on 'Edit Profile'.  The minimum you need to check or enter are the first three items below:
    • Check 'Show my email address'
    • Enter your 'Email address'
    • Enter your 'Display Name'
    • I hope you add a picture.  Just be sure it is no larger than 50k.
    • If you want people to be able to see an "About Me" page about you, check 'Share my profile' and fill in some info about yourself in the other boxes, especially the 'About Me' spot in the Extended section, and whatever else you want to share.
    • Click Save and you're done!
If you prefer to enjoy reading blogs quietly, enjoy! I don't mind and I certainly understand.


Friday, December 18, 2009

More redwork tidbits

A few more quick tidbits from yesterday's post.

If you're interested in the pattern for the redwork snowmen, you can purchase it from Wellington House Designs.  I purchased my pattern through Quilt Cove in Eagan, one of my favorite local quilt shops, if you're in the area.  The designer also sells a pattern for finishing it as a wall hanging, here.  I haven't decided how I'll set the blocks, although I have some great fabric picked out.

I did not use the stitches that were recommended on the pattern.

For my redwork, I use a hoop.  I keep the fabric just slightly loose in the hoop for stitching, just enough so I can make the stitches.  If I set the hoop on a table and push down in the middle of the hoop the fabric will just barely touch the table.

When I washed the first block, I realized I had a little too much tension in the stitches.  I'm still working on that.  Thank goodness for irons!

There's always something to improve on, isn't there?

Thursday, December 17, 2009

My redwork journey


These cheerful guys greet you when you enter my house.


I have a weakness for snowmen.  You might already know that.

When I fell in love with a redwork BOM featuring snowmen, it had been a long time since I did embroidery, so I set out on a web search to learn. 

I'll share what I'm doing, in the hopes it might be helpful to someone out there. 

I'm using plain muslin, the kind with the little brown nubs.  I love how the Olfa rotary pinking blade tames the edges of my embroidery and applique projects.  (By the way, the background is a purchased placemat... not by me.)


I use a light box and Sakura Pigma Micron 01 pen in brown to transfer the pattern.  Since it's permanent, I was nervous.  One tip I found helpful was to look ahead when you're drawing the pattern.  Imagine your pen is a car and look a little down the road to help keep everything lined up.  It helped me make better lines.  

When I stitch with a single strand I use the same needles that I use for applique, John James Applique #10's.  The needle threader is a time saver.  I can get frustrated when stitching with the DMC floss, so I use the Thread Heaven... but not always... I'm not certain if it helps or not.  (Someday I plan to try another thread, like Cosmo.)  I use a different needle when I'm stitching with two strands, but I have no clue what it is... sorry.  The eye is elongated, so I can't use the cute needle threader... or so the instructions warn me.   

Although the backstitch is very popular, I went with the stem stitch.  It looked stronger from a distance, even compared to multiple strands in backstitch.  I also wanted to use a more traditional stitch, something my grandmothers would have used.  I use single strand for the small and detailed stuff (leaves, apples, basket) and two strands for major stuff (snowman, tree).

I chose not to use backing, so the back of my stitches needed to stay clean. 

I was tickled to "discover" the waste knot technique.  It's a little slow, but the results are very nice.  I learned about it here from Mary Corbett's Needle'nThread blog. 

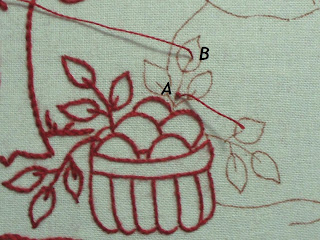
With a knotted thread I go in at A and back up at B.  Yes, the knot is on the front.


The first few stitches will cross over the back thread to secure it.  Since I can't do it without looking, when I go back down (stitch C) I turn the work over to make sure I come up on one side of the thread on the back.  When I come back up to the top, I make sure I've crossed over the back thread.  


You can see below that I wait to pull the top thread all the way through so I can find the line to poke the needle. 


How close is D to B?  If I want the start of the line to look as thick as the rest of the line, then D is very close to B, within a couple of threads.  If I want the line to have a finer end, then it's not as close.  

I don't always secure the thread right away.  For the leaf, I did the vein, worked around the leaf, and THEN secured the back thread.  I'm extra careful with the last step.  Pull the knot up away from the top and very carefully clip it off.  I've never cut the fabric or my working thread yet... knock wood. 

Starting a thread on a tight curve required a different technique, which I also learned from Mary Corbett.  I'll let Mary show you that... it's described under the first pic in the this post

There are oodles of instructions and diagrams on making a stem stitch and they don't all agree.  After trying it out on my scrap, practice piece, I settled on the following: work left to right, keep the loop of the thread toward me, and the tip of the needle comes out exactly where the last stitch ended.  The back of the work looks just like the backstitch.


(Some instructions show the stitch at an angle to the line, like this.  You can also bring up the needle to the right of the last stitch, rather than all the way to the last stitch.  I tried a variety to see what worked for me.  I highly recommend checking out Anne Sutton's great instructions, see here and here.)

Does it make a difference if vertical lines are stitched top to bottom or bottom to top?  Or if curves are stitched clockwise or counter-clockwise?  Nope.  As long as I turned my work so I'm working left to right and keep the loop towards me, it turns out the same. 

Points were a challenge, then I found the "trick" (thanks again to Mary, in the last four pics on this post). 

I'll show you.  My needle goes down at the point...


... comes up down the line...


... back down at the point, wait to pull the loop all the way until I take the next stitch...

... and finally back up half way between the two.  See how I've turned the work?  Left to right, loop towards me.  Pull the thread and off I go with more stem stitches.


Ending the thread is pretty straightforward.  Wind 'er around a few stitches on the back.  I also use this method to secure a new thread if the next stitches are next to existing ones, rather than the waste knot technique.


So there you have it.  There aren't absolute rights or wrongs.  This is simply what worked to handle the things that eluded me when I started. 

May your hands stay busy and happy!  

Sunday, December 13, 2009

It's been too long!
My goodness, it's been a busy month.  Work has been intense and I've been away on a couple of business trips.  I haven't been able to get in much stitching and my poor blog and blog reading have fallen WAY behind.  : (

I'll catch you up and show a couple of fun things.

My first block for the Civil War Bride Quilt is ~almost!~ done... just need to stitch the butterfly's antenna ... and give it a wash and press.  I'm loving applique! 


Last weekend I brought it with me to a local quilt shop to pick out fabric for the bottom of the block and was humbled and touched by the nice compliments. 

This little stitchery is from a free pattern, First Snow, I found in this post from chez Elisa's blog.  Her blog is in French... and no, I don't read French.  I right clicked on the pattern and saved the JPG.  Check out the gallery of pics... lovely.


Okay, I had intended on steering clear of the whole wool craft thing.  You know how it goes... I've got plenty of projects lined up already... and then Paulette-the-temptress :-) went a showed a snowman penny rug pattern by Cath's Pennies and it was instant love.  (I've told Paulette I need to keep my credit card far away when I read her blog, lol... she's always showing great projects.)

So here's another project on my to-do list, which I'm planning to get done before Christmas.  Aren't those snowmen cute? 


Since I'm mentioning projects on my to-do list, I'll show you a couple more.  These next two are projects that I designed back when I decided to do quilting.  Both are wall hangings.  I drew up the patterns and purchased fabrics... and they've been locked away in plastic for a long time (don't ask)... waiting their turn.

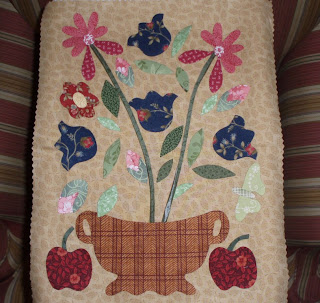
This is the first one I did.  I call it Basket and Stars.  I want it to have applique in the middle strips. 


I call this Winter Dusk.  Here, with our snowy winters, dusk takes on these wonderful shades of blue that I've always loved.  I wanted something that was reminiscent of those colors and had a wintery "feel". 


Do you realize I've never made a whole quilt? I do. I think about it a lot.  I'm feeling the need to get one finished. Up until now everything I've done on my quilting adventure has been done by hand, and the ambitious projects I started with (CWB quilt and Nearly Insane) will take a long time before they're done.  I think it's time I dust off my sewing machine, but it might need to wait until after Christmas. 

We decorated last weekend.  Our Christmas tree makes me smile every time I look at it. 


Google Reader has been giving me problems, which has made keeping up with blog reading more difficult.  Slowly I'm working on catching up.  I've been missing seeing everyone in blog-land.  I wish everyone joy and many smiles.  I'll try not to be gone so long.

Sunday, November 15, 2009

Weekends are too short

Last night we went to the annual lutefish dinner at a nearby church. For me it signals the start of the holiday season. It's that "thing" that makes it real that Christmas is around the corner.

The folks that serve wear Scandinavian-like costumes. We hear silly Norwegian jokes about Ole, Sven, and Lena. Lefse can be purchased at the bake sale. We sit at long tables as containers of potatoes, Swedish meatballs, corn, coleslaw, and other goodies are passed down, family style. There is plenty of lutefisk. Yeah, I do eat it.

We had finished the main dinner and they were about to start passing the desserts - cold, fruit soup and cookies - when my 16 year old DS mentioned he was still hungry. He wanted more lutefisk. We flagged one of the ladies, who came back with a big dish of it. It made me think of a Norwegian Oliver Twist, "Please sir, may I have more lutefisk?"  Makes me smile.

Next year I'll try to remember to bring my camera.

Do you have something that signals the beginning of your holidays?

I was optimistic that I'd be done with block 5 of CWBQ by the end of the weekend, but I couldn't ignore the whining of the errands, laundry and cleaning that required attention. I suppose clean underwear and groceries are important. ;-)

I'm beginning to think ahead to the next blocks. The fabric choices need time to percolate before they're final. 

This is what I'm thinking for block 20.


I'm leaning towards bluebird-like colors for the bird (the fabrics on the left).

Bluebirds were fairly common about 40 years ago, but then declined drastically. There have been efforts to recover the population by setting up special bluebird nest boxes, which have helped. Someday I hope to see one in the wild.


These are the auditions for block 2.


I heard from some of you that don't mind doing stems. Maybe I was too quick to judge. Since there are more in my future, I'll give them another chance.

Time to go, the laundry is calling. Weekends really are too short.

Friday, November 13, 2009

Progress, sure and steady


I'm plugging away. 

I like watching the picture emerge with every piece. It reminds me of a Poloroid. Remember those? You would snap the picture and at first there was nothing. Slowly the magic would happen and you'd start to see images come into view.  (True, it didn't take 2-3 weeks... don't burst my analogy.)


 Ah stems. Boring stems. Does anyone enjoy stitching stems?  Because I tried. I did make peace with the stems... ... but "enjoy" is too optimistic.

Endless stems. Do you know how many leaves equal one stem?........ I found myself with those thoughts as I was nearing the stem finish line.

Necessary (?) stems. Do you think the rest of the blocks would look okay without stems?  ;-)

As the stems droned on, I must have dozed for awhile because next thing you know I found myself with two stem ends that were supposed to go UNDER another stem that - you guessed it - was already stitched! 

Crud.

Spent some quality time with that little red tool.  (It's pointing to the scene of the crime.)


I'm glad GLAD to be past the stems.

Most of the action has been on the Civil War Bride block.

Here's a peak at progress on my redword snowmen BOM.  He's September.  With 10 more blocks after this one, it won't be done for this season. I can live with that.


And some final thoughts to share with you. About giveaways. I love giveaways, but I rarely enter them.

I am amazed at the community that we - YOU - have created. Having a blog and being the recipient of that love, I fully understand the desire to give a gift as a way to say thank you. I know I'll do the same.

Feeling lucky? You've got great odds to win with giveaways. So many giveaways have only 15, 30, or 50 entries. Even the "bigger" ones - like Kellie's (5 in 224), Cathi's (1 in 126), even Kim's (1 in 1227) - give you a great shot.  (Calm down, those are all closed.)

For many of us mail has been nearly reduced to junk. Even bills are going electronic. But to go to the mail and find a package? For moi? Definitely a WOO HOO moment. It never gets old. And to receive something from someone that you've felt a a kinship - a friendship... well, ain't that grand?!

The giveaway gifts are just great! But when I enter, it needs to be something I'll use in the near future. Because there are a lot of gals out there who can crank it out faster than me, and would put it to good use.

Eventually I will get faster at stitching, then ya'll better watch out 'cuz I'll be competing for the winnings with you. LOL

Friday, November 6, 2009

Auditions and Rejects

One of my favorite shows is "So You Think You Can Dance".  It's real dancers (okay, if you ignore the few delusional folks in the beginning) with extraordinary talent. Sometimes everything in a dance works together so perfectly it touches my emotions.

Someone said that picking fabrics is auditioning them.   

I was auditioning the "petally" flowers.  "Step right up to the stage..."

You're pretty, but you seem to blend in too much with the background. 


Looked at other hopefuls.  These next ones did make the first cut... enough for me to go to the trouble of cutting them out. But they were told they weren't what we were looking for.  


Go red?  No, got enough red already... the apples and other flower is red.  Medium pink seems to work.  I liked the variety of prints in the first choice, but my stash wasn't cooperating with that thought. Buy more? That'd be fun, but nah... it's good enough.


Next up, stems.  (Didn't realize we were auditioning stems in the pic above, did you?)

Lighter, or darker?  (I'm so glad we live in a digital age.)
Darker it is.


I still wonder about the butterfly.  I am not a butterfly person. I wanted something pretty, but a little subtle. Love the fabric.  Might be too subtle.  I'll stitch more of the block while I mull it over.


I needed thread.  The kind I like is 40 minutes across town.  Took care of that the other day... along with a few more fabrics - small cuts for $1 each and a few fat quarters.

Marked the background. That wasn't an easy decision as I've read others' cautions about this technique. I did test it carefully first. I like the freedom from the vinyl overlay.

I'm stitching the stems, but that looks to boring to show you. I'll share my progress sometime this weekend.

Sunday, November 1, 2009

Another applique project? Yes, most definitely, yes!

I like having multiple projects going at the same time.  So far, I've shared three of my projects... the redword snowman BOM, my summer basket applique, and the Nearly Insane blocks.

Here's a picture of the pattern of my latest project.  It's based on an applique quilt made in the mid-1800's.  The name of the pattern is Civil War Bride Quilt by Corliss Searcey (available from Threadbear - in Australia, no less!).


It's an ambitious project for me, but I couldn't resist.  I'll also be making a number of changes to the pattern as I go along... probably no elephant in mine, for instance. 

There's a group of ladies who are making this quilt and they have a group blog, the Civil War Bride Quilt blog blog, which I joined. That was also a big reason for deciding to tackle this project now. It's been neat to see everyone's blocks, get advice, and develop friendships.

I started with block 5... the one that's in the upper right corner.  I drew a different "urn" to something more my style.  The apples are also bigger than the ones from the pattern.  (When you live in a place named Apple Valley, you gotta have good-sized apples!)  You can see others' versions of block 5 here and here.

I finished prepping the pieces this weekend.  Here you see the pieces laying loose on the background fabric.  (It doesn't show all the stems.)  It took me a few tries until I was satisfied with the fabrics for the pieces... and I reserve the right to change it before it's stitched!


Let the stitching begin!  (You know, I'm finding that I like applique!) 

So that's enough projects, right?  Well, uh, yeah... I *might* have placed an order for a little project today.  Maybe once I show you, you'll understand.  ;-)

Friday, October 23, 2009

I'm Dating...

I've been a dabbler.

I've tried lots of different needlecrafts.  In no particular order:
Cross stitch...
  Punch needle...
    Knitting...
      Crochet...
        Tatting...
          Needlepoint...
            Sewing...
              And other crafts too. 

I have the stuff to do lots of that.  I have yarn and thread and fabric and tools and beads and a variety of goodies.  It was all... well... fun, but just okay. 

I was asked, "what's your passion?"  As in, that thing you love to do above all else.  Something that lifts your soul.  Well... uh... hmm... none of them felt like my passion (!).  Well shoot.  I wanted a passion.  I just hadn't found it. 

(Oh, and the person who asked?  Yep, had a passion.  Of course.  *grin*)

I think finding your passion is like finding your true love.  Some people know their true love the instant they meet.  The rest of us date.  We find someone we like.  And we date. 

I picked quilting.  (As in the broad term "quilting", from patchwork to applique, from hand to machine.)

So yes, we're dating.  We're going to try this for awhile.  We're going to get together often and see if we like each other.  To see if we find each other interesting. 

And so far? I think he might be the one. 

Okay you overachievers, settle down... some people DO have multiple passions.  (I better be careful about this parallel theme because that'd make them a polygamist.  LOL.)  For now, I'll start with finding one. 

Have you found your passion?

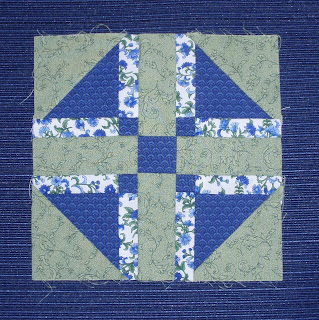
And since I'm supposed to show pictures, here goes.  My first quilting project is Nearly Insane, by hand. (I'm not a hand-stitching purist and have every intention of piecing with a sewing machine on other projects.)  For those unfamiliar, the pattern is made up of 98 unique 6" blocks. 

I'm doing it in greens and blues.  Here's block #21:


Block #6


Block #50:


Block #66:


The first one I made was #6.  (Sorry it's a little blurry.  Not trying to hide anything, just wasn't steady enough on the shot.)

My favorite is the last one. 

May your hands stay busy and happy. 

ADDED AFTER ORIGINAL POST:  I just checked my post and when I click my pictures they blow up HUGE.  I didn't intend on shoving my blocks in your face, so to speak.  What I want is so that you can click the picture and it fits in the screen, but you have that little thingy in the bottom corner that you can click to blow it up (go ahead, inspect away, if it makes you happy).  If anyone can help me out with that, I'd greatly appreciate it! 

Tuesday, October 20, 2009

Creating a Summer Basket

You see, I wanted a basket of flowers. Something easy going. Not fancy. When I looked in this book...


I knew that this was it.


I worried a little before I started.

About things like 1/8" stems. And pointy points.  And handling such a large piece of fabric. 

You know, important things that matter in life.

I needed to learn techniques.  I have a few books and looked through them. I looked online (and found some great tutorials, thank you very much).  I purchased two DVDs that helped a lot, Becky Goldsmith & Linda Jenkins Teach You to Applique the Piece O' Cake Way and Hand and Machine Applique by Karen Kay Buckley.  Loved the DVDs.

Most of what I do is similar to what I learned from Karen's DVD.  I was happier with the results.  (Someday I hope to improve my needleturn applique, but I didn't have the patience.)


Here's a few of the tools I use. A sanding board (take 1 cute clipboard, 1 sheet sandpaper cut to size, spray the back with adhesive spray, and ta-da).  Good (enough) scissors (Clover serrated edge is the blue handle, Ginger 5" in silver, and a Fiskars to cut paper).  Spray sizing (that's the lid) and a small stencil brush.  Pins and thread (Mettler 60) and Thread Heaven.  I found that pencil holders are a perfect size for holding a collection of the small items that need to be organized.  And a lint brush... always handy.  Because I have a dog that sheds... and she's big huge.  (A Newf.)

I use a vinyl overlay.  I think I like it.  It seems to be working okay, but I do think about other ways, such as blue marking pens.  Maybe it's the size that I'm working with that has me on the fence.


Here's the pieces that I've prepped, some face up, some face down.


What I do... Trace the pattern on freezer paper, iron it to another FP sheet to make it stronger, cut each piece out, iron to back of fabric, cut out each fabric piece with a seam allowance, "paint" light sizing on the seam allowance and use a little craft iron to iron the seam allowance over the edge of the freezer paper.  (I remove the freezer paper before I stitch it down.)

It's tedious and detailed and (for me) takes time. But I learned you should try to find joy in each step in the journey if you can.  (Kind of funny that I have patience for this and not for needleturn.  Analyze that!)

There's been very little stitching this past week.  Too much going on.  This weekend should be a quiet one.  Hopefully filled with lots of time to stitch. 

Sunday, October 18, 2009

Summer in Fall

I took on an applique project.  It's my first.  Normally, beginners start with a beginner pattern, with easy curves and easy points.  But I didn't want easy.  My nature is to dive in. 

After looking at a variety of patterns, I found one in the book American Stenciled Quilts by Vicki Garnas.  You heard that right... stenciled.  No "A" word in the book.

The pattern is supposed to be enlarged 250%.  But I liked a smaller end size.  I enlarged 200%.  (Without a border, it's about 30" x 18".)

Got that?  I picked a non-beginner pattern, that's wasn't designed for applique, and made it smaller. 

Cuz that's what I do.

And I couldn't be happier.

Here's a picture of the traced pattern, reduced to a single sheet of paper.  (I hope the pics are okay.  I'm still learning.)  I wanted a pattern and fabrics that said summer. 


I've sewn the stems, blue petals, one bud and some leaves to the background.  The red flowers and some leaves are prepped, but not sewn in the pic below.  The basket will be out of a navy blue with white print.  The tulips will be an orange print. 


I tried a few applique techniques before I started this project.  I chose to go with freezer paper on the back of the pieces, painting the fabric edges with light sizing and and ironing the edges over the FP.  Most of the pieces have been prepped. That took a LONG time.

I am delighted with every piece that I stitch, watching the picture be revealed in fabric. 


I love how the sun lit the leaves on this tree in my backyard today.  There was a slight chill in the air. 


Outside it's fall. And inside I'm sewing summer.