Tuesday, September 3, 2013

Enjoying the journey


I will never be accused of speeding through my stitching projects!  I won't be the person who churns out quilt after quilt in a month.  I do wish I was faster, but I trust I'll improve with time.  I have learned to enjoy each step of the journey.  While some people don't "get" why we stitch, there is something very satisfying in the creation, accomplishment, and beauty of what we create. 

The journey with 'Love Entwined' begins - appropriately - with a compass.   


Here's where I'm at.  


And here's how I got here.

My first hurdle was deciding on colors and fabric.  With my handy new hinged mirror (love it!)  I only needed a few snips of fabric for each view.  Many, many, MANY of these combos tried to convince me they were “it”.  Deciding wasn’t easy.  (And based on the Yahoo BOM group's messages, I'm not alone!)  

I looked at the photos I took, pulled out possible candidates for pieces further down the road in future blocks, and gave the ideas time to reveal the direction (pun intended   :-).  

In the end, I really liked the navy, red, and taupe prints.  Since it's a busy pattern, I plan to use occasional neutrals, like the taupe, to give some relief.  The green and yellow (and other colors) will find their way in soon enough.  


Believe it or not, these three fabrics are my compass "background" with some selective cutting.  I really like the text in the rose fabric.  (These 3 turned out more subtle than I thought they'd be, but I'm satisfied.)  


Fabric decision made, on to piecing!  I’ve paper pieced before, but knew I’d be happier with the results if I could hand piece it successfully.  I used doubled freezer paper, ironed the pieces to the fabric, outlined  with a mechanical pencil, and cut the pieces with my add-a-quarter ruler.   


 Remember I said "if I could hand piece it successfully?"  Key word: SUCCESSFULLY?!?   : )

Let’s just say the first section was lovely... and a big oops!  I managed to match my pieces “backwards”.  Thank goodness for the overlay I made!  Each time I finished a section, I gently finger pressed the seems open and checked the section against the overlay.    


My oops was a sacrifice... rather than risk using pieces that were stretched out of shape from taking them apart, I cut new pieces.  

(FYI, since I modified the compass pattern slightly, my piece numbers don't match the pattern.) 

Phew, MUCH better!


With 48 pieces in a 7 1/2” circle, precision was critical.  I figured that if I stitched right on the line, using a fairly thin needle (John James #11 Sharps) and thin thread (Aurifil 50/2), that should work.  That, and tiny stitches.

I was super careful with matching (probably excessive!) and took my time.   I would pin through the crosshair of the tip and matching spots...


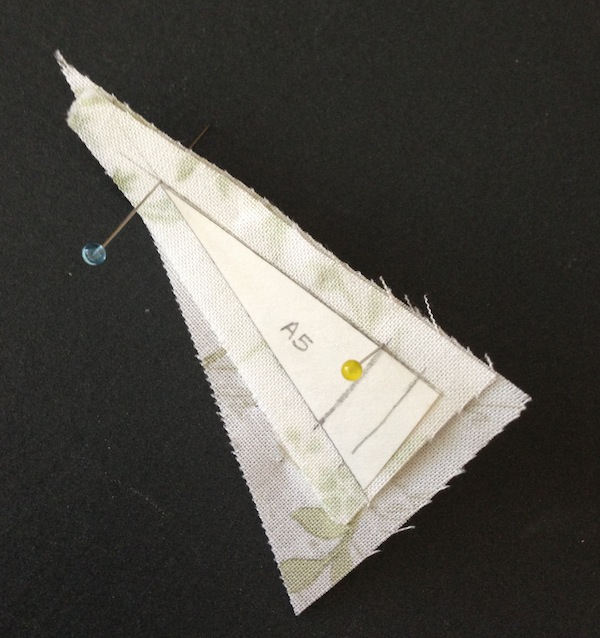
making sure it went through the exact spots on the back.


I poked more pins through the stitching line (the yellow headed ones), then carefully held the seam while I put in the pins with the blue heads, and then removed the yellow headed pins.    


I started each seam one stitch from the end so the knot wouldn’t interfere with sewing later pieces (shown from the back, below),   


took I backstitch to the starting point then stitched down the line...


always checking the back to make sure I stayed on the line on the back too.  (The shiny two spots in the blue circle are my needle.)  I managed 2-4 stitches at a time.  


When three pieces met I’d work my way “around” the seams.  Nice explanations here and here

Oooooh, happy moment!


Once I finished stitching the compass pieces together, my next challenge was pressing it.  I looked at what others had done and googled pressing mariner’s compass... all rotating clockwise?... open flat?... combo?  I have the crazy ambitious crazy idea that I might hand quilt this.  Therefore I decided to press towards each point and press the seam of the V’s  in between the compass points open.  I’m hoping it will also give my points a little extra “body” and will give me space to hand quilt in the white V’s next to the points.  

I worked my way around the circle,  pressing only one side of each point and opening the V seams.   


Then I worked my way around again, pressing the other side of each compass point onto the point.    


For the final pressing I flipped the compass right side up, used my template to make sure everything was perfectly aligned and placed pins around the edge of the circle to hold it in position while I ironed from the front.  (Fortunately no ironing-police caught me, lol!)  


Now to choose my fabrics for the compass center, ring and dots.  

This certainly is stretching my skills.  And I LOVE it!  

Happy dance... I can’t wait to get to applique!  

Oh... the other reason this is taking time is that I've been watching this little sweetheart (first - only - DGS) the last few weekends.  Exploring, laughing, walking, bopping to the music... life as an almost-1-year-old.   


I forgot how fast they grow.  Stitching will wait.