Wednesday, December 23, 2009

Merry Christmas!

Christmas dinner is at my house this year.  It's a first in many, many, many years.  I'm feeling rusty, but I know it will work out just fine.  There'll be 9 of us.  I have my list and won't stress (too much) about it. Today I'm making the Cranberry Sherbet, doing more cleaning and washing the wine glasses.

I won't be dreaming about a white Christmas... because we'll have one. 

A winter storm is heading our way.  Between tonight and Saturday, they say we'll get a foot or more of snow... which will add to the 4 inches already on the ground. 

The shovels are ready.  It's a good workout.

We don't always have snow on the ground at Christmas. Around here they call that a brown Christmas. I love snow at Christmas.

It's going to feel like living in a snow globe.
 
I saw the poem below on Paula's blog and she said I could share it with you.  (I'm still amazed at the countries that are represented on the blogs; Paula's from Luxembourg.  Pretty cool.) 


Santa's on his way

Twas the night before Christmas, I'm glued to the tree.

I'm wondering what Santa brought just for me.

Could it be fat quarters or a pattern or lace?

Or a quilt kit, I said, with a smile on my face.

And that's when I heard him, "Hi Santa," I said.

"You know....good little girls should be in their beds ."

"I know I should Santa, and now I've got caught.

But I was just so excited to see what you brought."

"Well, let's take a look in this room where you work."

He shook his head quickly and left with a jerk.

I heard him exclaim as he put it in gear.

"You've got enough stuff, I'll see you next year!"

author unknown


Santa's clearly not a quilter.  LOL.

Sunday, December 20, 2009

Loosen up and enjoy the stitching

To hoop or not to hoop? 

Jenny doesn't use a hoop.  Do you know Jenny?  She's a talented designer from Australia and has this blog, Jenny of Elefantz.  She gives some good reasons why not... and her proof is in the beauty of her embroidery.

With generous permission of Jenny, here's what she said about hoops:

"No, I never use a hoop. When I was rushing through my embroideries I had to use a hoop because when you rush you pull, then you pucker the fabric...but I have not used a hoop for the last year. Since I took care with the stitching and slowed down to enjoy the process and rhythm of the needle and thread working together with the fabric I have had no need of a hoop. The stitches are gently woven into the fabric and I can see that I have no need to pull or tighten. As I relaxed, the stitches relaxed with me."

I encourage you to read more in her original post on the subject (and check out her lovely work!).  Here are more tips from Jenny, and she has this about doing the satin stitch.  Good stuff.

I haven't yet given up the hoop.  It feels like an extra hand to help hold my work, but I've "loosened up" and slowed down, trying not to rush the stitches. 


But I'm still experimenting.  I plan to pull out my practice piece to try working without a hoop. 

My practice piece?  It's not pretty, but it's oh-so-useful.  See?


Where I've tried stem stitch and backstitch...


and practiced applique techniques...


and applique stem techniques...


and which has some of my first applique attempts...


Here are a few more tips, especially if you're new to embroidery:
  • Use a length of thread slightly longer than the length from the tip of your fingers to your elbow. 
  • During stitching, your thread will twist.  Every so often, let go of the needle and let it dangle towards the ground and let the thread untwist. 
  • Sometimes my thread gets naughty knotty.  It seems to happen when I've forgotten to untwist, or tried to use too long a thread, or am pulling the thread too quickly.  I carefully use the eye end of my needle to undo the knot so I don't fray the thread.  If it happens again with the same thread, I usually find that the troublemaker can't be rehabilitated, so I'm better off ending the offender and starting a new thread.  
  • Your needle will wear out and will need to be changed. I can tell when it's time because it seems like the needle doesn't slide through as easily.  When I look at the old needle versus a new one, I can see the difference... the finish looks worn down and dull.
  • You should remove your work from the hoop when you finish a stitching session, however "do as I say, not as I do." (Grin.)
I can't say it any better than Jenny did, "Enjoy the process, love what you do, and be at peace as you sew."

Saturday, December 19, 2009

Commenting on Blogs

The calendar might say it's still fall, but winter - and snow - is here to stay for the next few months.  It's the serene season.  The front planter is filled with greens, red twig dogwood and dried hydrangeas. 


Do you comment on blogs?  For a long time I didn't.  Why?  Because I didn't understand how it works and it seemed complicated.  It also seemed like you needed to have a blog to comment.  (You don't.)  Skip down a couple paragraphs below if you're interested.

I still don't comment on every post or blog I enjoy.  It takes time and I've found myself overwhelmed with the things I've added to my regular to-do list in the last couple months: writing my blog, stitching more, and commenting, in addition to work and normal life stuff.  I'm slowly adding to the list and trying to find a balance.  I am very grateful for the comments I receive because I know you've taken the time for me.

When you leave a comment, do you get a reply from the blogger back to your email?  You should... maybe not to every comment, but if you've NEVER received an email reply, you may be a "Noreply".  (Theresa W, I thought about this because you came up as a Noreply.)  It adds another dimension to this friendly blog-land... kind of like pen pals.  Did you have a pen pal when you were growing up?  I had a girl from England and looked forward to writing to her and receiving letters from her.  But I'm geting off track.... 

Fix your Noreply

If you use Blogger, it's simple to fix the no reply.  Sign in to Blogger, click Edit Profile (from your Dashboard), put a check on 'Show my email address', enter your email address in the 'Email address' spot, then click Save Profile.  That's it!

Want to comment without having a blog?

Okay, now to those of you who don't have a blog and never comment, but want to.  Here's what I'd suggest (although like everything, this isn't the only way). 

Before you go to the first step, now's the time to set up a separate email account if you want the blog correspondence to be separate from your other email.  (For example, I set up a free Gmail account.)
  1. Go to the Blogger start page.
  2. Click Create a Blog.  Trust me... you won't create a blog.
  3. Fill in the fields on the Create a Google Account form, then click Continue. 
    (If you already have a Google Acount, click 'sign in first' at the top of the page and log in.)
  4. Here's where you take the fork off the blog road.  On the 'Name your Blog' page, click at the bottom where it says 'Skip this and create a blog later'. 
  5. Are you at the Dashboard page?  Good.  Click on 'Edit Profile'.  The minimum you need to check or enter are the first three items below:
    • Check 'Show my email address'
    • Enter your 'Email address'
    • Enter your 'Display Name'
    • I hope you add a picture.  Just be sure it is no larger than 50k.
    • If you want people to be able to see an "About Me" page about you, check 'Share my profile' and fill in some info about yourself in the other boxes, especially the 'About Me' spot in the Extended section, and whatever else you want to share.
    • Click Save and you're done!
If you prefer to enjoy reading blogs quietly, enjoy! I don't mind and I certainly understand.


Friday, December 18, 2009

More redwork tidbits

A few more quick tidbits from yesterday's post.

If you're interested in the pattern for the redwork snowmen, you can purchase it from Wellington House Designs.  I purchased my pattern through Quilt Cove in Eagan, one of my favorite local quilt shops, if you're in the area.  The designer also sells a pattern for finishing it as a wall hanging, here.  I haven't decided how I'll set the blocks, although I have some great fabric picked out.

I did not use the stitches that were recommended on the pattern.

For my redwork, I use a hoop.  I keep the fabric just slightly loose in the hoop for stitching, just enough so I can make the stitches.  If I set the hoop on a table and push down in the middle of the hoop the fabric will just barely touch the table.

When I washed the first block, I realized I had a little too much tension in the stitches.  I'm still working on that.  Thank goodness for irons!

There's always something to improve on, isn't there?

Thursday, December 17, 2009

My redwork journey


These cheerful guys greet you when you enter my house.


I have a weakness for snowmen.  You might already know that.

When I fell in love with a redwork BOM featuring snowmen, it had been a long time since I did embroidery, so I set out on a web search to learn. 

I'll share what I'm doing, in the hopes it might be helpful to someone out there. 

I'm using plain muslin, the kind with the little brown nubs.  I love how the Olfa rotary pinking blade tames the edges of my embroidery and applique projects.  (By the way, the background is a purchased placemat... not by me.)


I use a light box and Sakura Pigma Micron 01 pen in brown to transfer the pattern.  Since it's permanent, I was nervous.  One tip I found helpful was to look ahead when you're drawing the pattern.  Imagine your pen is a car and look a little down the road to help keep everything lined up.  It helped me make better lines.  

When I stitch with a single strand I use the same needles that I use for applique, John James Applique #10's.  The needle threader is a time saver.  I can get frustrated when stitching with the DMC floss, so I use the Thread Heaven... but not always... I'm not certain if it helps or not.  (Someday I plan to try another thread, like Cosmo.)  I use a different needle when I'm stitching with two strands, but I have no clue what it is... sorry.  The eye is elongated, so I can't use the cute needle threader... or so the instructions warn me.   

Although the backstitch is very popular, I went with the stem stitch.  It looked stronger from a distance, even compared to multiple strands in backstitch.  I also wanted to use a more traditional stitch, something my grandmothers would have used.  I use single strand for the small and detailed stuff (leaves, apples, basket) and two strands for major stuff (snowman, tree).

I chose not to use backing, so the back of my stitches needed to stay clean. 

I was tickled to "discover" the waste knot technique.  It's a little slow, but the results are very nice.  I learned about it here from Mary Corbett's Needle'nThread blog. 

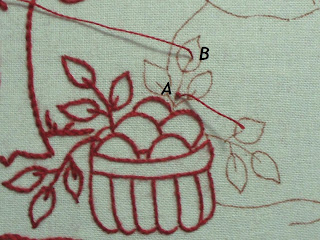
With a knotted thread I go in at A and back up at B.  Yes, the knot is on the front.


The first few stitches will cross over the back thread to secure it.  Since I can't do it without looking, when I go back down (stitch C) I turn the work over to make sure I come up on one side of the thread on the back.  When I come back up to the top, I make sure I've crossed over the back thread.  


You can see below that I wait to pull the top thread all the way through so I can find the line to poke the needle. 


How close is D to B?  If I want the start of the line to look as thick as the rest of the line, then D is very close to B, within a couple of threads.  If I want the line to have a finer end, then it's not as close.  

I don't always secure the thread right away.  For the leaf, I did the vein, worked around the leaf, and THEN secured the back thread.  I'm extra careful with the last step.  Pull the knot up away from the top and very carefully clip it off.  I've never cut the fabric or my working thread yet... knock wood. 

Starting a thread on a tight curve required a different technique, which I also learned from Mary Corbett.  I'll let Mary show you that... it's described under the first pic in the this post

There are oodles of instructions and diagrams on making a stem stitch and they don't all agree.  After trying it out on my scrap, practice piece, I settled on the following: work left to right, keep the loop of the thread toward me, and the tip of the needle comes out exactly where the last stitch ended.  The back of the work looks just like the backstitch.


(Some instructions show the stitch at an angle to the line, like this.  You can also bring up the needle to the right of the last stitch, rather than all the way to the last stitch.  I tried a variety to see what worked for me.  I highly recommend checking out Anne Sutton's great instructions, see here and here.)

Does it make a difference if vertical lines are stitched top to bottom or bottom to top?  Or if curves are stitched clockwise or counter-clockwise?  Nope.  As long as I turned my work so I'm working left to right and keep the loop towards me, it turns out the same. 

Points were a challenge, then I found the "trick" (thanks again to Mary, in the last four pics on this post). 

I'll show you.  My needle goes down at the point...


... comes up down the line...


... back down at the point, wait to pull the loop all the way until I take the next stitch...

... and finally back up half way between the two.  See how I've turned the work?  Left to right, loop towards me.  Pull the thread and off I go with more stem stitches.


Ending the thread is pretty straightforward.  Wind 'er around a few stitches on the back.  I also use this method to secure a new thread if the next stitches are next to existing ones, rather than the waste knot technique.


So there you have it.  There aren't absolute rights or wrongs.  This is simply what worked to handle the things that eluded me when I started. 

May your hands stay busy and happy!  

Sunday, December 13, 2009

It's been too long!

My goodness, it's been a busy month.  Work has been intense and I've been away on a couple of business trips.  I haven't been able to get in much stitching and my poor blog and blog reading have fallen WAY behind.  : (

I'll catch you up and show a couple of fun things.

My first block for the Civil War Bride Quilt is ~almost!~ done... just need to stitch the butterfly's antenna ... and give it a wash and press.  I'm loving applique! 


Last weekend I brought it with me to a local quilt shop to pick out fabric for the bottom of the block and was humbled and touched by the nice compliments. 

This little stitchery is from a free pattern, First Snow, I found in this post from chez Elisa's blog.  Her blog is in French... and no, I don't read French.  I right clicked on the pattern and saved the JPG.  Check out the gallery of pics... lovely.


Okay, I had intended on steering clear of the whole wool craft thing.  You know how it goes... I've got plenty of projects lined up already... and then Paulette-the-temptress :-) went a showed a snowman penny rug pattern by Cath's Pennies and it was instant love.  (I've told Paulette I need to keep my credit card far away when I read her blog, lol... she's always showing great projects.)

So here's another project on my to-do list, which I'm planning to get done before Christmas.  Aren't those snowmen cute? 


Since I'm mentioning projects on my to-do list, I'll show you a couple more.  These next two are projects that I designed back when I decided to do quilting.  Both are wall hangings.  I drew up the patterns and purchased fabrics... and they've been locked away in plastic for a long time (don't ask)... waiting their turn.

This is the first one I did.  I call it Basket and Stars.  I want it to have applique in the middle strips. 


I call this Winter Dusk.  Here, with our snowy winters, dusk takes on these wonderful shades of blue that I've always loved.  I wanted something that was reminiscent of those colors and had a wintery "feel". 


Do you realize I've never made a whole quilt? I do. I think about it a lot.  I'm feeling the need to get one finished. Up until now everything I've done on my quilting adventure has been done by hand, and the ambitious projects I started with (CWB quilt and Nearly Insane) will take a long time before they're done.  I think it's time I dust off my sewing machine, but it might need to wait until after Christmas. 

We decorated last weekend.  Our Christmas tree makes me smile every time I look at it. 


Google Reader has been giving me problems, which has made keeping up with blog reading more difficult.  Slowly I'm working on catching up.  I've been missing seeing everyone in blog-land.  I wish everyone joy and many smiles.  I'll try not to be gone so long.